
Manage Courses
How do I combine (cross-list) courses?
This process may be helpful for instructors who teach multiple sections of a given course and want to combine all sections into a single course in Canvas. It is also possible for instructors to combine course sections that do not share the same course name and IDs.
- Automated Course Combination Service
- Manually Cross-List a Course
- Change the Course Code of a “Parent” Course (after cross-listing)
- De-Cross-List a Course (after cross-listing)
Before Cross-Listing:
- Cross-listing courses should only take place before course sites are published and before any grades are entered in Canvas.
- Decide which one of your Canvas course sites will serve as the “Parent” course. The “Parent” course will contain enrollments from any cross-listed or “Child” course sites.
After Cross-Listing:
- Instructors and students will only see the “Parent” course site on their Canvas Dashboard.
- Students who register for your “Child” course sections will automatically appear in the “Parent” course site in Canvas.
- Instructors can change the Canvas course code of any “Parent” course, which can help resolve confusion when students register for a “Child” section but only see the “Parent” course appear in Canvas.
Automated Course Combination Service
Enroll in the Automated Course Combination Service
Available to instructors (teachers) in Canvas only. To receive assistance with the automated course combination service please contact: help@georgetown.edu
By enrolling in the Automated Course Combination Service, the multiple sections of a given course for which you are an instructor will be automatically combined (cross-listed) into a single course site each semester.
For example, if you are teaching three sections (01, 02, 03) of HIST-101 and you have enrolled in the Automated Course Combination Service, the “Child” sections 02 and 03 in Canvas will be automatically combined into the “Parent” section 01. The lowest course section number (e.g. HIST-101-01) will always serve as the “Parent” course.
Once you enroll in the service, ALL of your Canvas courses with multiple sections will be automatically cross-listed EACH semester.
Note: Upon first enrolling, the automated process to cross-list your courses in Canvas will typically take place within an hour.
Unenroll from the Automated Course Combination Service
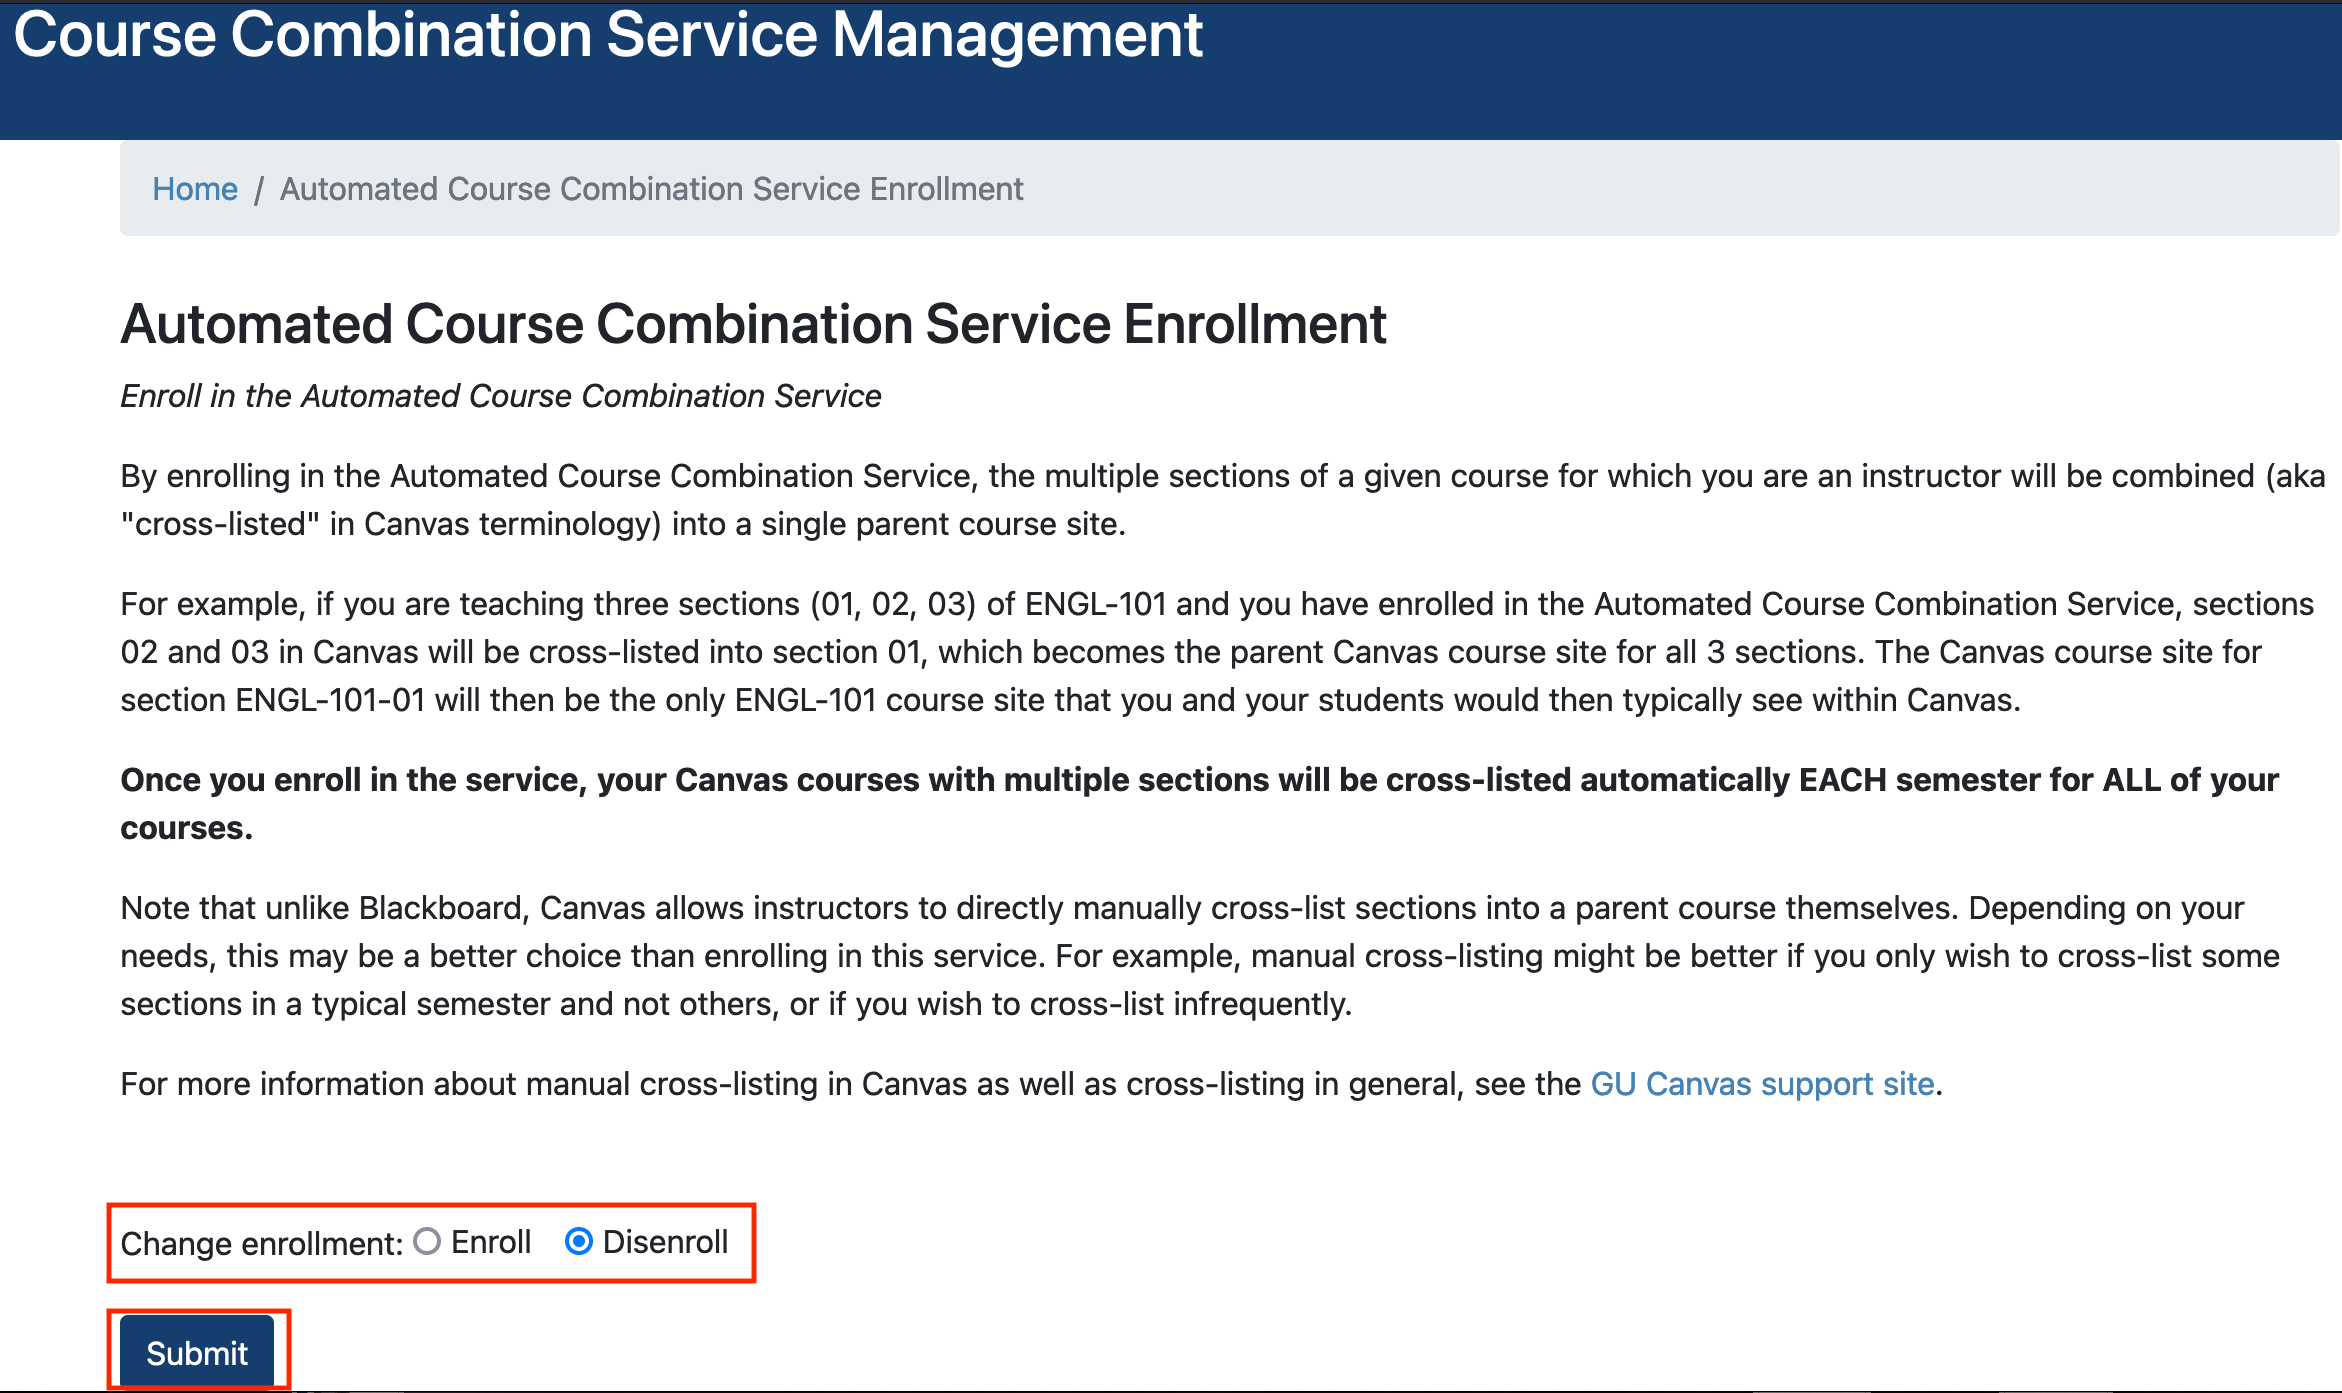
For those who no longer want to participate in the Automated Course Combination Service, you have the option to disenroll from the service. To do this, login to the Course Combination Management tool and follow the instructions below.
- Click the Automated Course Combination Service Enrollment tool link
- Click the “Disenroll” button at the bottom of the page
- Click “submit” to complete the process
Manually Cross-List a Course
This process may be helpful for instructors who teach multiple sections of a given course and want to manually combine all sections into a single course in Canvas. Manual Course Combination can be particularly handy if you need to combine course sites that do not share the same course ID, or if you are not enrolled in the Automated Course Combination Service.
To receive assistance with manually cross-listing your courses please contact Canvas Support.
Before you begin the Manual Course Combination process, decide which one of your Canvas course sites will serve as the “Parent” course. The “Parent” course will contain enrollments from any cross-listed or “Child” course sites. Typically, the lowest course section number (e.g. HIST-101-01) should serve as the “Parent” course.
In this example, we will manually cross-list HIST-101-01.Fall2017 (PARENT) with PSYC-101-01.Fall2017 (CHILD).
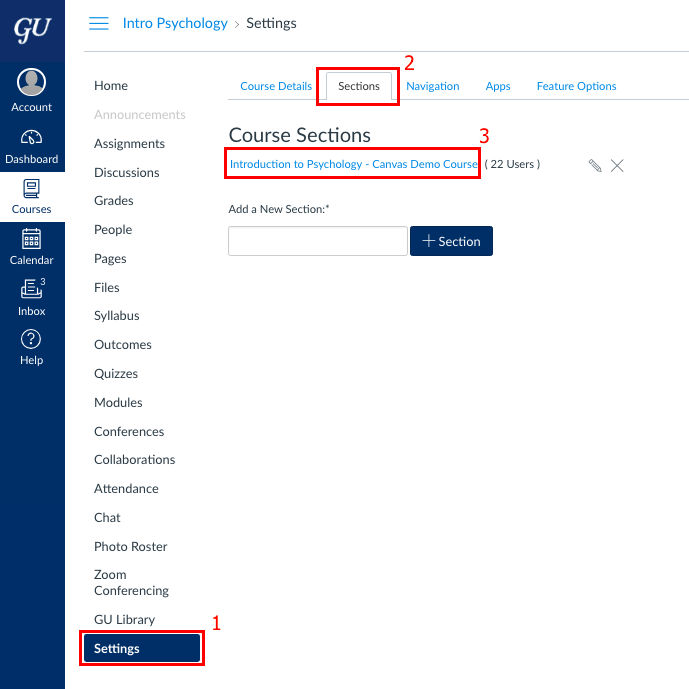
Start in the CHILD course.
- Click on the Settings button located at the bottom of the course menu.
- Click on the Sections tab at the top of the page.
- Under Course Sections, click on the CHILD course name or ID displayed.
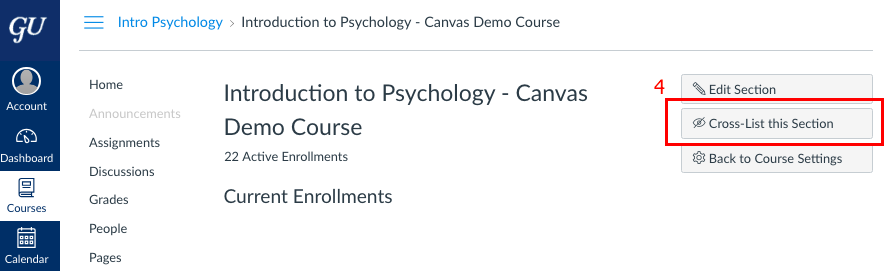
- Locate the Cross-List this Section button and click it (the button could be located at the top right or bottom of the page depending on your browser settings).
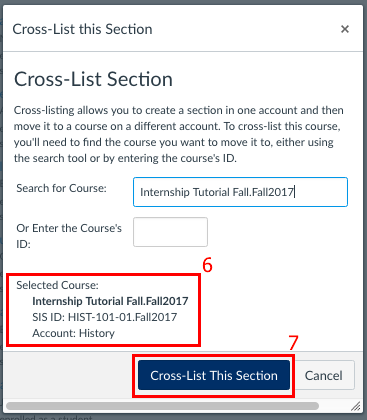
- On the pop-up window, enter the “Parent” Course ID (e.g. HIST-101-01.Fall2017) into the Search for Course field.
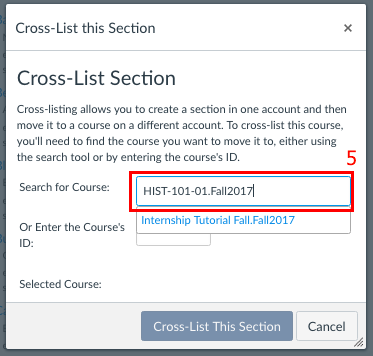
- Confirm the selected course is correct.
- Click Cross-List This Section.
You will automatically be redirected to the “Parent” course where the enrollments have been (combined) cross-listed.
Change the Course Code of a “Parent” Course
After cross-listing is complete, instructors have the option to change the Canvas course code of any “Parent” course. This can help resolve confusion when students register for a “Child” section using GU Experience for example, but only see the “Parent” course appear in Canvas. This is only a visual change in Canvas for those enrolled in the course, and does not affect other academic or registration systems at Georgetown.
For example, the “Parent” course in Canvas MGMT-201-01 that contains the “Child” course MGMT-201-02 can be changed to simply read MGMT-201 or MGMT-201-[01,02].
To change the course code of your “Parent” course, login to the Course Combination Management tool and follow the instructions below:
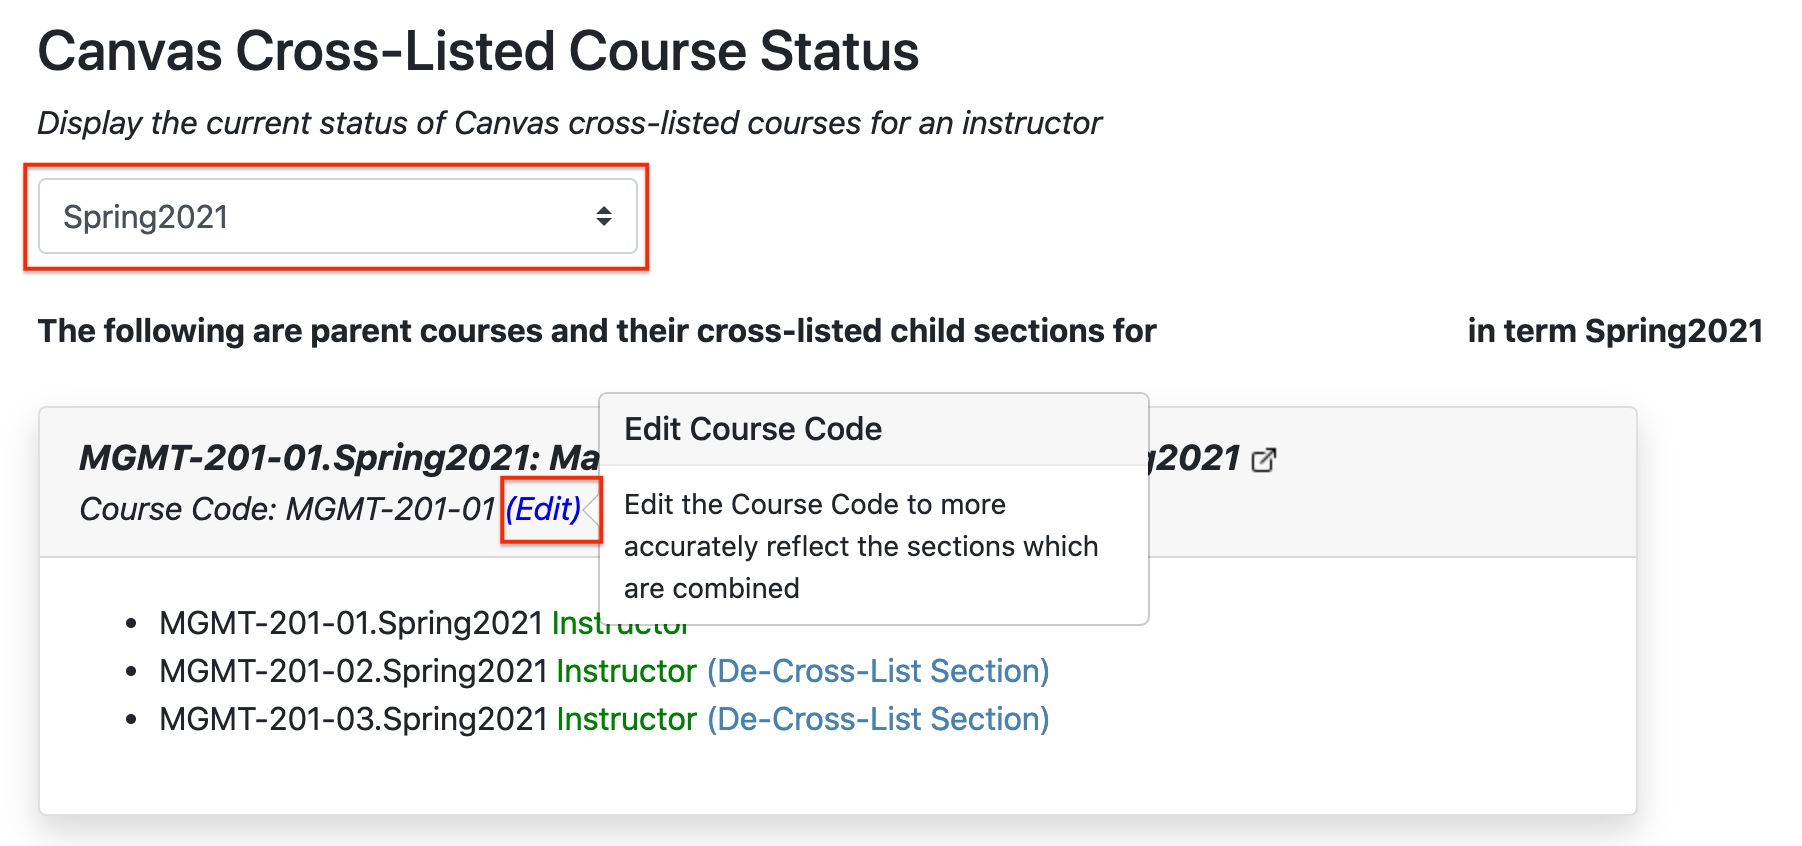
- Click on “Canvas Cross-Listed Course Status” tool link
- Enter your NetID
- Select the term (semester)
- Click the “Edit” button on the “Parent” course (see screenshot below)
- Select the course code from the list of available options
- Click “Update” to save your changes
De-Cross-List a Course
You can “De-Cross-List” a child course from a Parent course. We recommend you contact Canvas Support for assistance, but it is possible for instructors to de-cross-list their courses.
If the “Child” section of the course you wish to de-cross-list contains grades and other student activity we recommend you do not de-cross-list the course. However, if you must de-cross-list a course with student grades, we recommend you export the Gradebook before de-cross-listing. Once de-cross-listing is complete, you can then import the Gradebook into the new standalone version of the course section.
To de-cross-list a course, login to the Course Combination Management tool (available to Canvas instructors only) and follow the instructions below:
- Click on “Canvas Cross-Listed Course Status.”
- Enter your NetID.
- Select the term.
- Locate the “Child” course listed under the “Parent” course that you want to de-cross-list and select the option to “De-Cross-List Section”
- On the pop-up warning message, select the option to “De-Cross-List Section”
You will then see a green “success” message at the top of the page, and the course will no longer appear on the Course Combination Management tool page.
How do I copy content from one course site to another?
The Import Course Content process starts in the “destination” course site and NOT in the “source” site. In other words, start the course copy process in the empty course shell.
There are three basic ways to copy content from one course to another:
- Use the “Import Course Content” option to bulk copy course content such as files, assignments, quizzes, modules, pages, discussions, group sets, and more from one Canvas course site to another. You can choose to copy all course content, select specific content, adjust events and due dates from one course to another.
- Use the “Copy To” option to copy (one-by-one) specific announcements, assignments, discussions, modules or module items, pages, and quizzes to another course. This process starts in the source site.
- Import a Canvas course export file (IMSCC file type) into your Canvas course. This option is a must if you opted to export your course from another institution that uses Canvas. Otherwise, for Georgetown faculty and staff who are copying course content from one course to another we recommend one of the first two options above.
After Copying Course Content
- Review any assignment or quiz due dates to ensure the correct dates are set for the new term.
- Check to make sure the course “End Date” has been set correctly. Go to the “Settings” page of the destination course site and remove or adjust the course end date as necessary.
- Check any third-party tool content. Some tools will require further action in order to work correctly– see below for more details.
Copying Third-Party Tools
It is imperative that the following actions are taken AFTER the course copy process is complete in order to ensure correct functionality and availability of any integrated tools (also called LTI, external, or third-party tools and apps).
- Panopto: Perform a “Panopto course copy” to properly copy the media into the new course. This process will ensure any existing viewer analytics, discussions and notes that were created within the Panopto playback window are NOT copied to the new course; and any embedded Panopto recordings within Canvas Pages, Assignments, Quizzes, Announcements, and Modules will automatically update the permissions.
- Respondus Lockdown Browser: The instructor will need to click on the Respondus Lockdown Browser button on the course menu to reestablish the connection before Respondus will work properly in the course. Check out the GU Respondus Lockdown Browser support page for more information about Respondus LockDown Browser in Canvas.
- ShareStream: Copying Canvas content from one site to another does NOT copy or move ShareStream content. In order to copy ShareStream content, the instructor will need to add ShareStream MediaManager or ShareStream Pick-n-Play to the course menu. Once added, follow the instructions on the page to copy content from your source site to your destination site.
- Turnitin (External Tool): When copying Turnitin assignments that use the “Turnitin External Tool” version of Turnitin, the instructor will need to click on each Turnitin assignment to reestablish the connection. During this process we recommend you take the time to update the due dates associated with the assignment. It is not enough to use Canvas’s built-in “adjust dates” tool as the “Turnitin External Tool” assignment dates will not be adjusted by this process.
- VoiceThread: The instructor will need to click on each VoiceThread activity to reestablish the connection. You will be presented with a few options on how to setup the newly established VoiceThread activity. Check out the GU VoiceThread support page for more information about the available VoiceThread activities available in Canvas.
How do I export a course?
Canvas course exports do not include backups of student activity, interactions and grades. The Gradebook can be exported separately as a comma separated values (CSV) file.
Canvas course exports do not include any third-party integrated tool configurations (nor student activity, interactions and grades).
You might want to export a Canvas course for many reasons. For example, you can export your Canvas course to create a course backup on your local computer, give to someone in another Canvas account, import to another institution’s Canvas account at a later date, or import into a different Learning Management System altogether.
Canvas course exports are packaged as IMSCC ZIP files, which can only be opened by programs that support Common Cartridge files. Once downloaded, you can also change the extension from .imscc to .zip and treat it as any other ZIP file.
How do I change the course end date?
An instructor can change the participation start and end dates for a course. Dates can be shorter than or overlap the term dates. Course end dates override any term date settings. To learn more about term dates please see our help page on Term End Dates in Canvas.
If an instructor wants to allow students to participate and submit to course activities past the Canvas term end date, or want to close off participation or access before the term end date, they can:
- Change the course end date and;
- Restrict students from viewing course material after the term or course end date.
Some programs and schools at Georgetown already enter a course end date, but instructors in Canvas can still change those manually during the term.
Instructors cannot change the course end date after the term end date has passed. Instructors must change the course end date before the term end date takes effect. If a course end date was not set prior to the term end date, and instructors want to continue to use the course for teaching purposes (e.g. allow students to submit to course activities) then they will need to contact their program’s Canvas admin or help@georgetown.edu for assistance.
How do I manage courses on the Dashboard?
The Canvas Dashboard displays your active courses. In the Dashboard, any courses you have with an instructor role will be listed first, followed by TA roles and any other custom instructor-based roles. Courses where you are enrolled as a student will automatically appear last on your Dashboard.
It is possible to customize your courses on the Dashboard, like adding a course nickname, changing the course card color, and moving course cards around on your Dashboard. These changes will only apply to you, and your TAs and students will not see any customizations you’ve made on your Dashboard.
Also, it is possible to “favorite” any active courses that appears on your All Courses page, which will automatically add them to the Dashboard Card View.
How do I view all my Canvas courses?
You can view your current courses, past, and future course enrollments in Canvas. On the blue Global Navigation bar click “Courses” and the “All Courses” button. This will load the All Courses page.
Don’t see what you are looking for?
Check out the Get Help and Training & Support pages for more resources.