
People in Courses
- How do I add people to my course?
- How do I remove people from my course?
- What are the differences between the various course roles in Canvas?
- How do I give students access to my course?
- How do I prevent students from accessing my course during or after the semester?
- How do I give people outside of Georgetown access to my course?
- How do I organize the Photo Roster by section?
- How do I add pronouns to my Canvas account?
- Do consortium students access my course?
- Do alumni have access to Canvas?
How do I add people to my course?
For student enrollments to automatically and officially appear in Canvas, they must be added in the registrar’s system: GU Experience
However, in some cases instructors may want to manually (unofficially) add people to their courses. For example, when a TA or co-instructor needs access to a course, but does not need to appear in the course catalogue nor report final grades in GU Experience.
Things to Note:
- All Canvas users are required to have a NetID. Learn how to add people in courses that are not affiliated with Georgetown.
- Before manually adding people in your course we recommended you see the list of course roles and permissions, and select a role that’s appropriate for the person or people you are adding.
- If the person you have manually added is automatically removed from the course a few hours later then you will need to use the “unofficial student” or “unofficial teacher” role when adding them to your course.
- When people are manually added they will receive an email in their Georgetown inbox, as well as a pop-up invitation in Canvas where they can accept the invitation.
- After people are manually added they will need to first accept the invitation before they can access the course. Those who are manually added and haven’t yet accepted the invitation will appears as “Pending” on the People page in the course.
Manually Add People in a Course
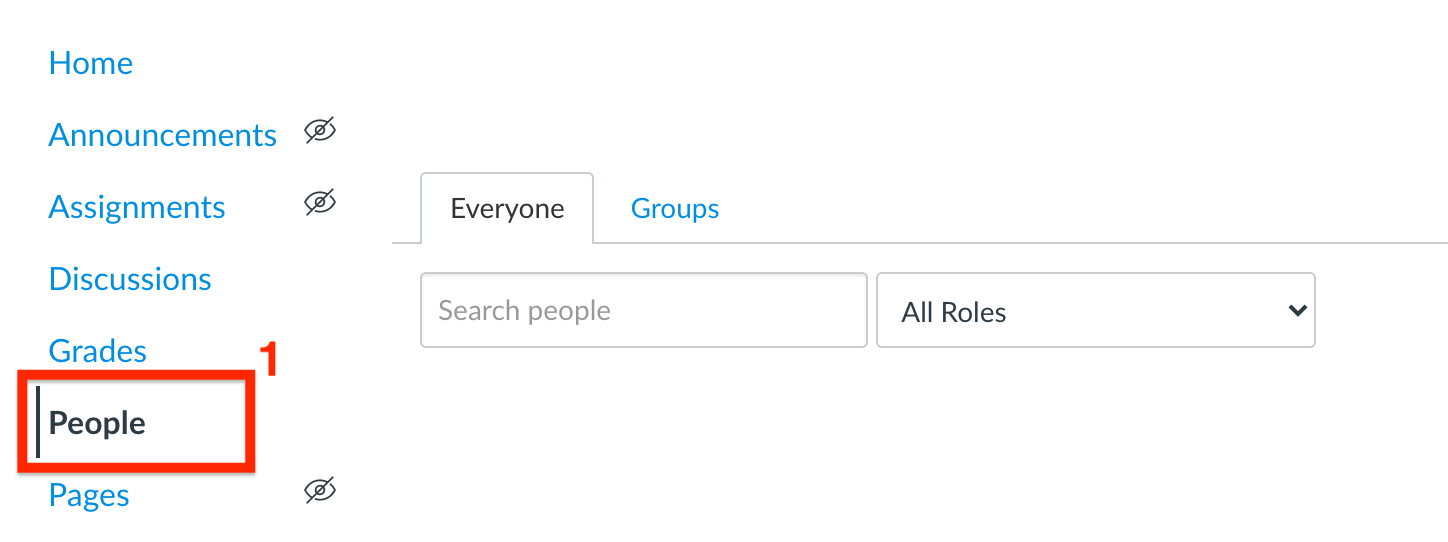
- Access the course where you want to add someone, then click on the People button on the course menu.
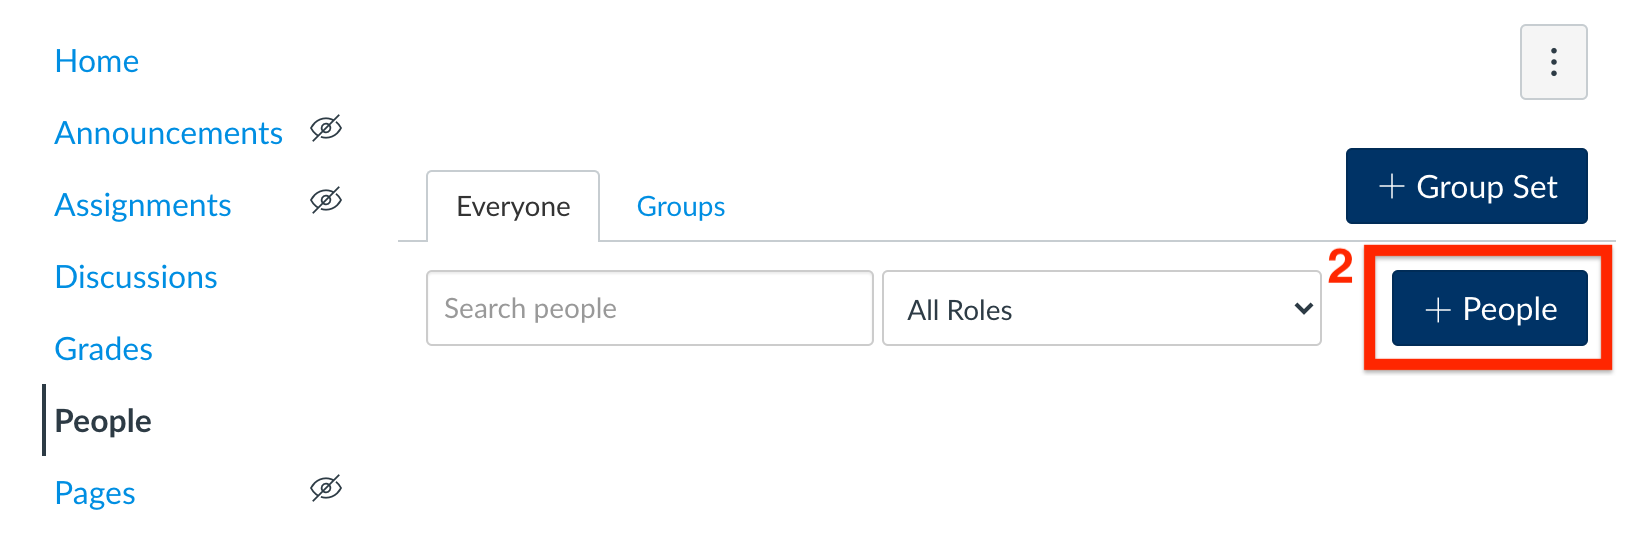
- Click on the +People button at the top right of the page.
- On the ‘Add People’ pop-up window enter the person’s NetID@georgetown.edu.
Note: If you receive an error message after step 6 then select the ‘Login ID’ button on the ‘Add People’ pop-up window, and enter the user’s NetID without the “@georgetown.edu.”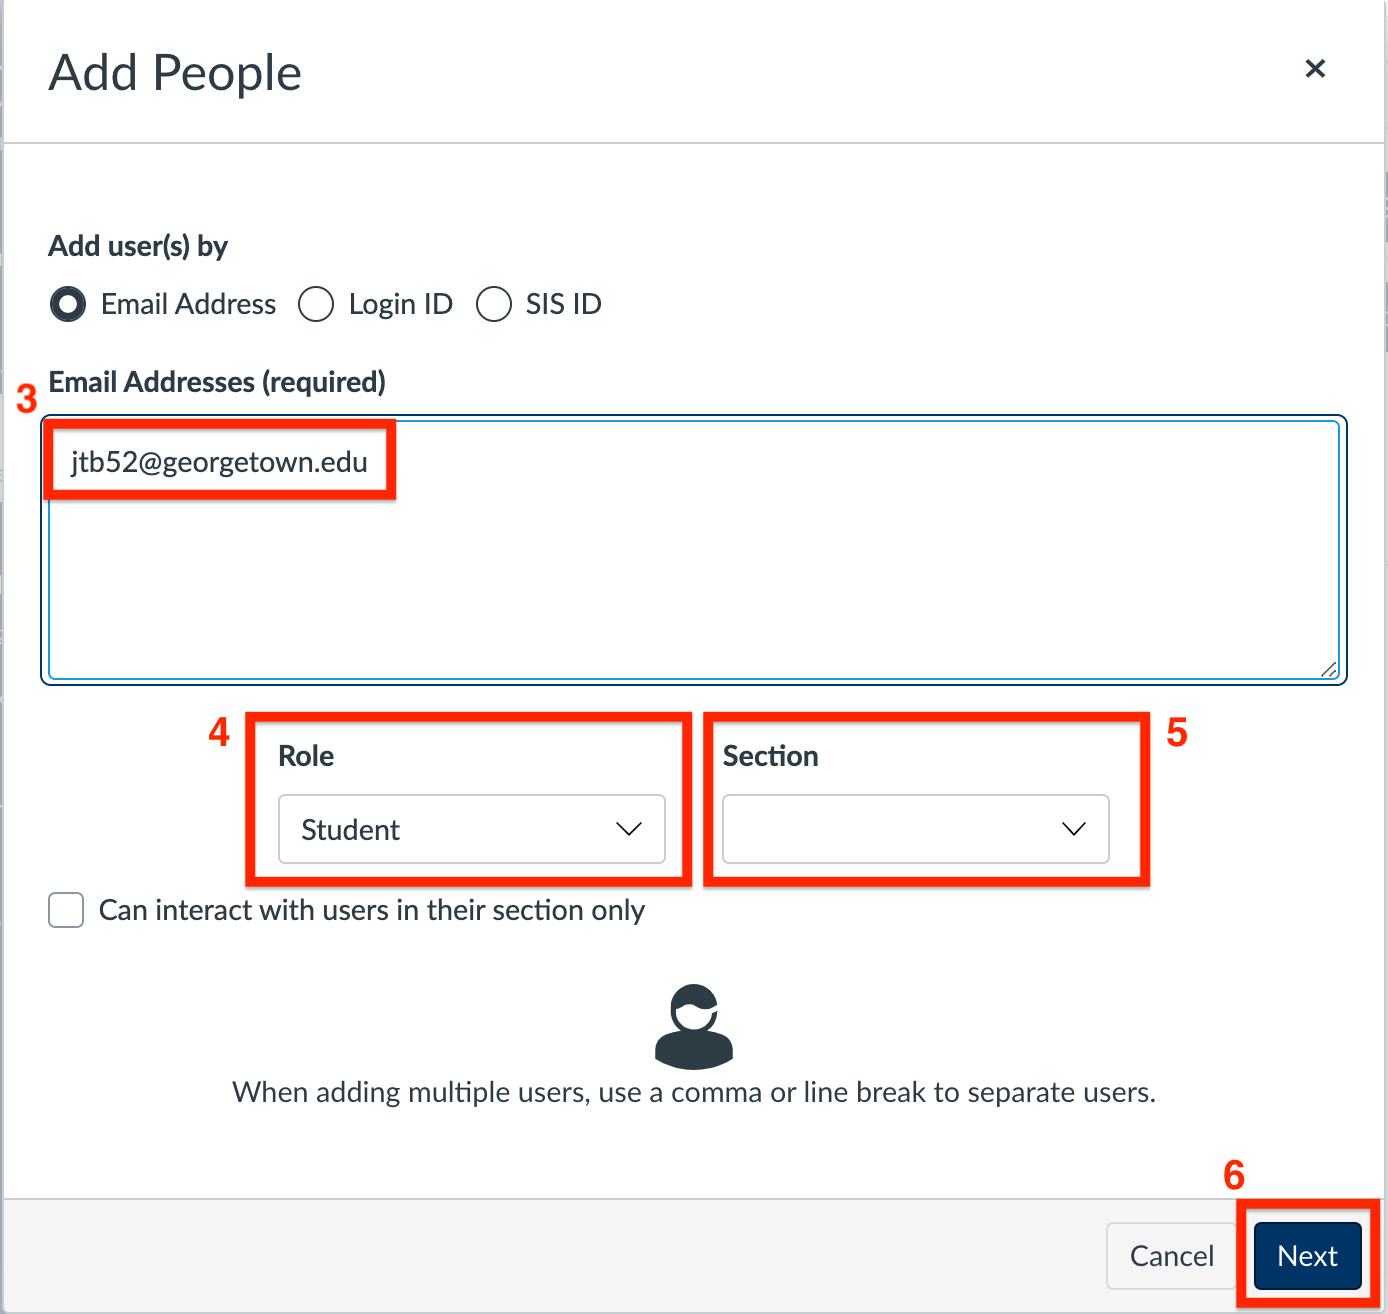
- Then, select the appropriate ‘Role’ (e.g. Student, Teacher, etc) for the person you are adding. See our list of Canvas course roles and permissions for more information.
- Optional: If your course is cross-listed you may consider to specify the section you want to add the person. This can be especially helpful when manually adding co-instructors and TAs, as section limitations allow them to only see and grade students in their same section(s). Adding the person into the parent section will allow them to see and access all content and student activity in the course.
- Click the ‘Next’ button at the bottom of the ‘Add People’ pop-up window. The system will confirm the NetID(s) entered are correct, and will display their first and last name for your review.
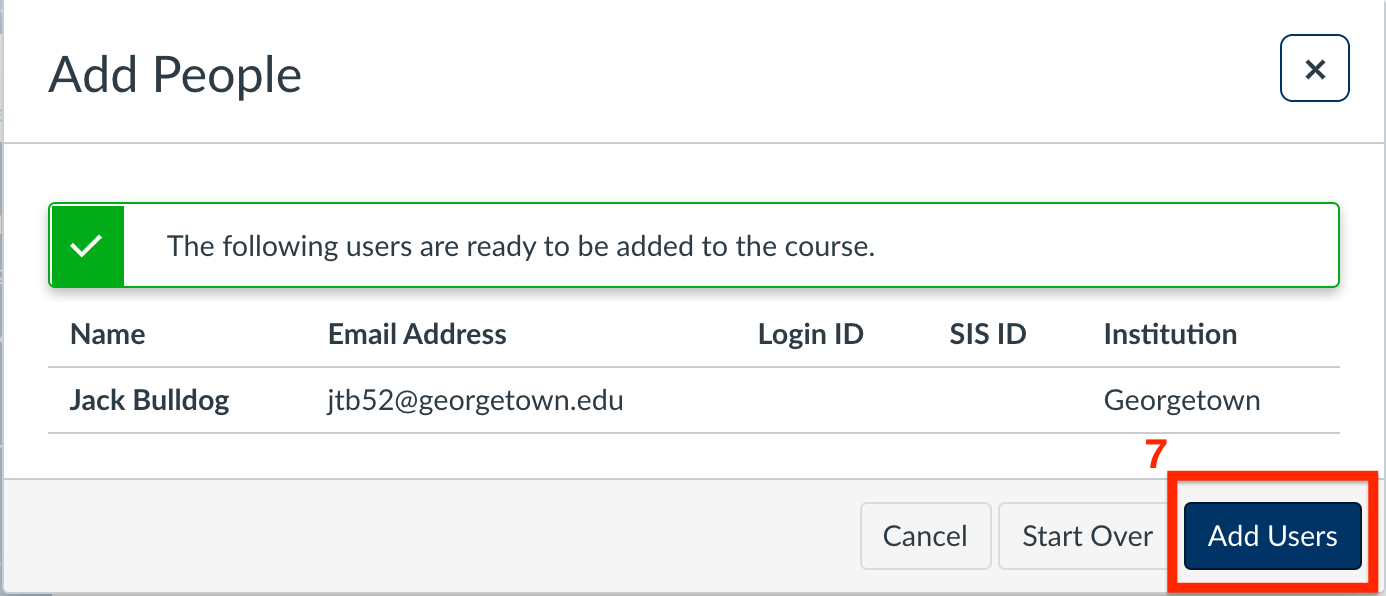
Note: If you receive an error message stating Canvas was unable to find the person then go back to step 3, select the ‘Login ID’ button on the ‘Add People’ pop-up window, and enter the user’s NetID (e.g. hoyaj12) without the “@georgetown.edu.” - Click the Add Users button to complete the process.
The People page in your course will present the newly added person(s) as having “Pending”status. The pending status will be removed once the they have accepted the invitation.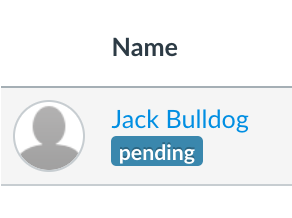
How do I remove people from my course?
Students that drop a course in GU Experience will be unenrolled automatically from the associated Canvas course site. These changes are not immediately reflected in Canvas and will be present within 6 hours (but no later than the next business day).
Official student and instructor course enrollments via the Registrar’s system GU Experience will populate automatically in Canvas. As a result, an instructor cannot remove official enrollments from a course site. Only if someone has been manually added in a Canvas course can they be manually removed from the course.
How do I remove someone who was manual added to a course?
Can I organize the Photo Roster by section?
Yes. Access the Photo Roster in your Canvas course and select the section number from the drop down menu at the top of the page. If the option to select a different section does not exist then there is only one section in the Canvas course site.
How do I add pronouns to my Canvas account?
When you are making decisions about adding or updating your pronouns and/or name in Canvas, you might want to consider the following factors:
- Adding/updating your pronouns or editing your name in Canvas will not affect other university systems. You will have to go to other platforms such as Zoom or GU Experience and set your pronouns in those systems too.
- Adding/updating your pronouns or editing your name will be reflected in all of your Canvas courses, past and present. Canvas does not currently offer the ability to make account changes isolated to specific courses.
- Most integrated tools in Canvas (also called LTI, external, or third-party tools and apps) do not currently support displaying Canvas pronouns properly or at all.
- To display your pronouns in Canvas you will need to edit your Canvas account settings. There you can select your pronouns from a drop-down menu. Pronouns selected from the drop-down menu will automatically display after your name in Canvas and display in multiple areas including: account profile page, Canvas inbox, course discussions, course people and group page(s), and course activity comment fields.
- If your pronouns are not represented in the drop-down menu, you can opt to edit your “Display Name” in Canvas and add your pronouns after your name.
For information or feedback about the available pronoun options in Canvas, please contact: oads-team@georgetown.edu
Add or Update your Pronouns in Canvas as an Instructor:
- Login to Canvas
- Click Account (above the dashboard button)
- Click Settings
- Click Edit Settings (right side of the page)
- Select the pronoun from the drop-down menu
- Click Update Settings (bottom of page)
For more details see the Canvas guide on How to I select personal pronouns in my user account as an instructor?
Note: If your pronouns are not represented in the pronoun drop-down menu then you can manually add your pronouns to your name in Canvas. Please see the section below for more details.
Manually Add your Pronouns to your Name in Canvas:
Warning: Adding your pronouns to your “Full Name” in Canvas will disrupt the alphabetical order of the Canvas Gradebook, Canvas Speedgrader and alter your account data in third-party Apps like Panopto and others.
Adding pronouns to your “Display Name” only in Canvas will prevent this disruption. Pronouns added to your “Display Name” will appear for you and others on your Canvas account profile page, Canvas inbox, course discussions, course people and group page(s), and course activity comment fields.
- Login to Canvas
- Click Account (above the dashboard button)
- Click Settings
- Click Edit Settings (right side of the page)
- In the “Display Name” field add your pronouns after your name
- Click Update Settings (bottom of page)
For more details see the Canvas guide on How do I change the settings in my user account as an instructor?
What are the differences between the various course roles in Canvas?
- Student
- Unofficial Student
- Student No Messaging
- Teacher
- Unofficial Teacher
- TA
- CNDLS Course Admin
- CNDLS GA Admin
- Designer
- Faculty Assistant
- Program Admin
- Program Admin and Content
- Observer
Student
Student permissions are restricted, but they have enough permissions to access and interact with course content. Specifically, students are permitted to view announcements, files, submit assignments, send inbox (email) messages to instructors and students, create/post/view discussions, create collaborations, and view people in the course.
Unofficial Student
This role has exactly the same permissions as the regular Student role. It can be used to manually add a student in a course, rather than having the student officially enroll via GU Experience. This role is typically used for unofficial auditors or guest students. There are certain cases where using this custom role is necessary, such as when a student officially enrolls in a course, then drops it, and then needs to be manually added back to the Canvas course.
Student No Messaging
This role implicitly is another kind of “unofficial student” that mostly maintains the same permissions as the regular Student role, except it restricts the following permissions pertaining to the student initiating certain types of in-course communication and messaging:
- Cannot send inbox (email) messages to instructors or students
- Cannot use the Collaborations tool
- Cannot view people in the course
Teacher
The Teacher role grants a user course admin permissions, giving them control over their assigned course or courses. However, this role is prevented from manually adding and deleting third-party course apps and tools.
Unofficial Teacher
This role has exactly the same permissions as the regular Teacher role. It can be used to manually add a teacher in a course, rather than having the teacher officially enroll via GU Experience. This role is typically used for unofficial auditors, co-instructors or guest instructors. There are certain cases where using this custom role is necessary, such as when a teacher officially enrolls in a course, then drops it, and then needs to be manually added back to the Canvas course.
TA
The TA role has permissions similar to the Teacher role, but has the following course permission exceptions and restrictions:
- Can create Zoom Conferencing Meetings
- Cannot cross-list (combine) course sections
- Cannot publish, conclude, or set start/end dated for a course
- Cannot set final student grades
- Cannot set course rubrics
- Cannot add/remove Teachers, TAs, and Designers
CNDLS Course Admin
The CNDLS Course Admin is based on the TA role, but has the following course permission exceptions:
- Can create Zoom Conferencing Meetings
- Can cross-list (combine) course sections
- Can publish, conclude, or set start/end dated for a course
- Can create, edit, or set course rubrics
- Can add/remove Teachers, TAs, and Designers
CNDLS GA Admin
This role has permissions similar to the CNDLS Course Admin except it further restricts the following course permissions:
- Cannot view, edit, or set student grades
- Cannot add/remove Students, Teachers, TAs and Designers
- Cannot view list of people in the course
Designer
The Designer role has permissions similar to the Teacher role, but has the following course permission restrictions:
- Cannot create Zoom Conferencing Meetings
- Cannot view, edit, or set student grades
- Cannot view course statistics, user activity, and student interaction reports
- Cannot add/remove Teachers, TAs, and Designers
Faculty Assistant
This role has is based on the TA role, except it has the follow course permission exceptions and restrictions:
- Can create Zoom Conferencing Meetings
- Can cross-list (combine) course sections
- Can publish, conclude, or set start/end dated for a course
- Cannot view course statistics, user activity, and student interaction reports
- Cannot view course groups
- Cannot create, edit, or set course rubrics
- Cannot view, edit, or set student grades
- Cannot view or link quiz question banks
Program Admin
The Program Admin role is based on the Teacher role, but has the following course permission restrictions:
- Cannot create Zoom Conferencing Meetings
- Cannot create course content (add files, assignments, quizzes, discussions, pages, etc.)
- Cannot add/remove Students, Teachers, TAs, and Designers
- Cannot cross-list (combine) course sections
- Cannot publish, conclude, or set start/end dated for a course
- Cannot edit or set student grades (can view grades)
- Cannot create or edit course groups
- Cannot create, edit, or set course rubrics
- Cannot reply to discussions
- Cannot send inbox (email) messages to instructors or students
- Cannot use the Collaborations tool
Program Admin and Content
The Program Admin and Content role is baed on the Designer role, but has the following course permission exceptions and restrictions:
- Can view student grades
- Cannot create Zoom Conferencing Meetings
- Cannot edit or set student grades
- Cannot view course statistics, user activity, and student interaction reports
- Cannot add/remove Students, Teachers, TAs, and Designers
- Cannot send inbox (email) messages to instructors or students
- Cannot cross-list (combine) course sections
- Cannot publish, conclude, or set start/end dated for a course
- Cannot create or reply to discussions
- Cannot create or edit course groups
- Cannot create, edit, or set course rubrics
- Cannot use the Collaborations tool
Observer
The Observer role can be linked to a specific student user enrolled or added in a course.
- Observers have the fewest course permissions and can only view course content.
The authoritative Instructure documentation for all course role permissions can be found at the following links:
- What course roles and permissions are available in Canvas?
- Canvas Course Role Permissions (this page is designed for Canvas Admins as a complete reference for the Permissions page).
Don’t see what you are looking for?
Check out the Get Help and Training & Support pages for more resources.