
Creating and Arranging Course Content
How do I reorder, hide or show items on my course menu?
As an instructor, you can control which items appear in course menu (Modules, Assignments, People, Files, third-party tools and apps, etc.). Items that don’t have any content will be automatically hidden from students. For example, if there are no Quizzes in the course, you will see the Quizzes item on the course menu, but students will not see it at all. In these cases, you can tell which items on the course menu are hidden from students by the “Slashed Eye” Icon next to the item name.
How do I use the Rich Content Editor?
The Rich Content Editor (RCE) is the tool in Canvas that allows you to format text, add images, attach files, link to websites, embed media, etc. when creating announcements, assignments, discussions, pages, syllabus, quizzes and quiz questions.
Watch a video tutorial of the RCE or access Canvas’s RCE instructor guide for more information.
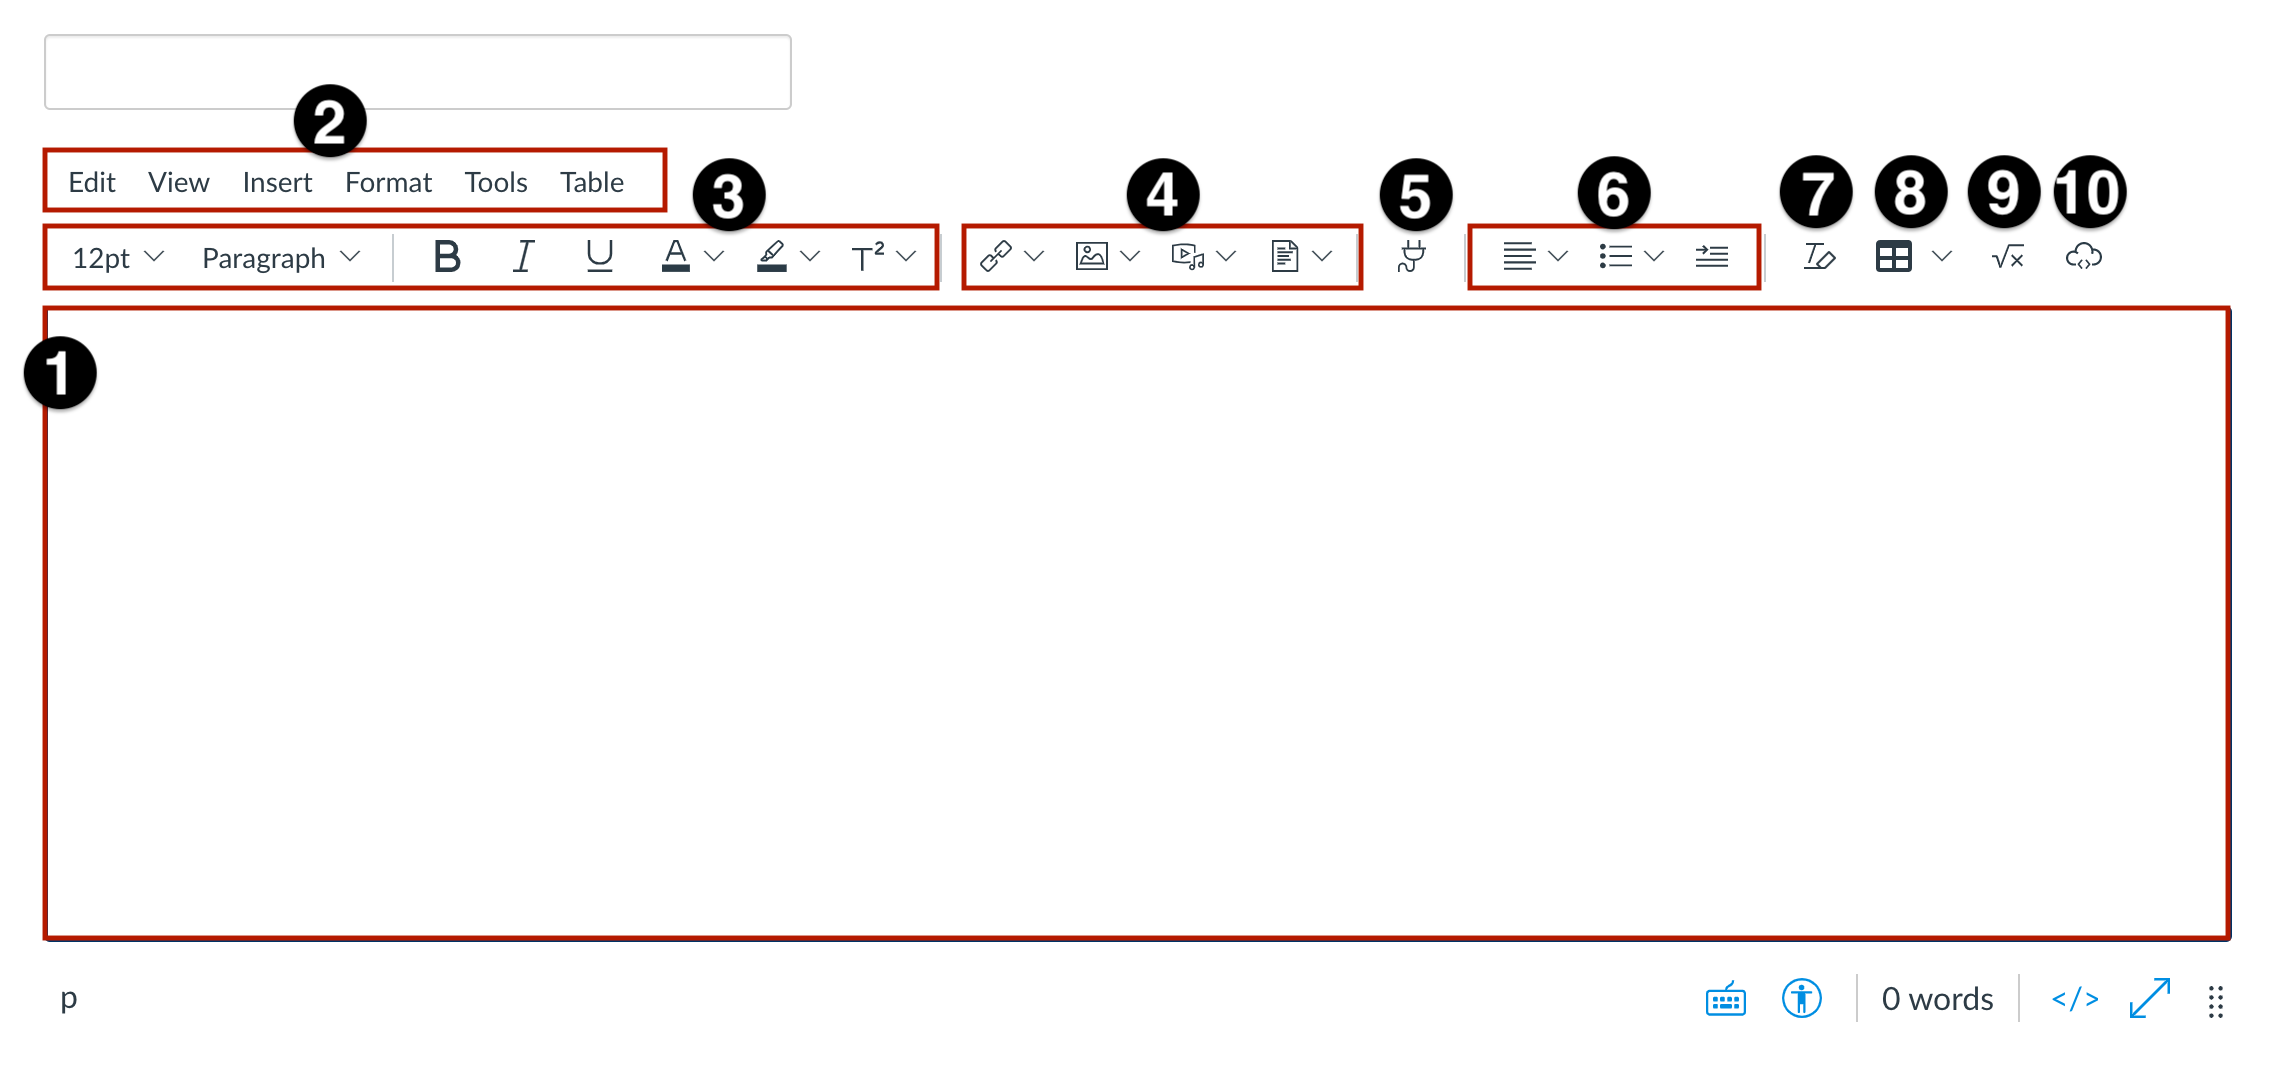
[1] The content area, you can add and preview the page content. [2] In the menubar, you can use the menu options to format the page content, insert media or add external tools. [3] Use the toolbar to format text; [4] insert links, images, media, and documents; [5] open external tools; [6] format paragraphs; [7] clear formatting; [8] add tables; [9] insert an equation; and [10] insert embed code.
The Accessibility Checker and HTML/Text Editor are located at the bottom right of the RCE content area.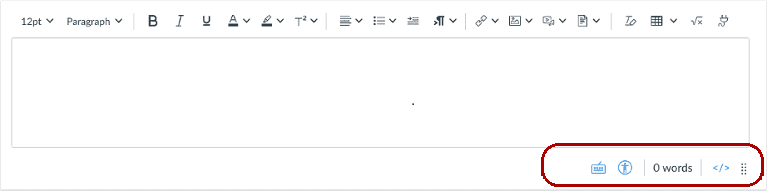
If the browser isn’t expanded to fit the full width of the toolbar, the toolbar displays an “Options” menu that includes the remaining toolbar items.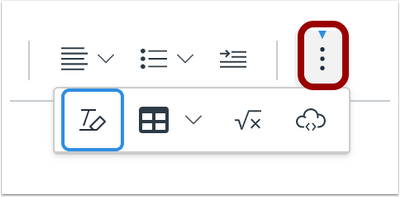
How do I create, edit and delete Icons using the Icon Maker in Canvas?
You can access the Icon Maker in Canvas through the Rich Content Editor when you create or edit an Announcement, Assignment, Discussion, Page, Classic Quizzes, and the Syllabus page.
You can use Canvas’s predefined shapes and images or upload your own to make icons within the Rich Content Editor. After you create an icon in the Rich Content Editor, you can edit the icon. If you need to remove an icon you created, you can delete an icon from course files.
- How do I create an icon using the Rich Content Editor Icon Maker?
- How do I edit an icon made using the Rich Content Editor Icon Maker?
- How do I delete an icon made using the Rich Content Editor Icon Maker?
Things to Note:
- Who can create icons?
Any user in a course, where the RCE appears, can create an icon that will be saved in the course Files area. - Who owns the icons?
Icons made using the Icon Maker are saved in the course Files area. The course “owns” them. Icons are not tied to an individual. - Where is the “database” of icons made using the Icon Maker?
Icons made using the Icon Maker are saved in a folder titled “Icon Maker Icons” in the course Files area. - Who can edit the icon after it gets created?
Any user in the course who has edit access where the icon is located within the RCE (e.g. Page) can edit the icon. For example, if your course home page has icons that were made using the Icon Maker then only Teacher, Designers and TAs, will be able to edit. While it is possible to allow students or any user in a course to edit a course Page it is not the default setting; but if you opted to change this setting it would allow those users to edit the icon. - Can icons be edited/updated in bulk, or do I need to touch each one to edit them?
When you select to edit an icon there’s an option where you can apply changes to all instances of the icon within the course. - How do I copy icons?
There are a few ways to do this: 1) If you want to copy an icon to another page in the course (for example) simply create a new page, and select the icon maker from the toolbar. Then on the drop down menu select the option to open ‘Saved Icon Maker Icons’. 2) If you want to copy all icons to another course it is probably best import them using the course copy method. 3) If you want to copy one icon to another course you can do that easily in the Files area in your course –> locate the icon –> mouse over the file–> click the three-dot menu –> click ‘copy to’ and select the course. Finally, 4) you can always copy the icon’s html and paste it, but be wary of doing this across courses as it can introduce permission/visibility issues as the icon is stored in a course’s files area.
How do I embed Google Drive files in Canvas?
There is a known issue that affects embedding files that are located in Google Team or Shared Drives.
Using the Canvas Rich Text Editor (RCE), you can embed Google Drive file(s) into Canvas announcements, assignments, discussions, pages, syllabus, quizzes and quiz questions. You can share a Google Docs, Sheets, Slides, PDF, video, image, or any other file in your Drive.
Embedding Drive files following the guide below will automatically handle all file permissions. In other words, you won’t need to change the share settings on the file within Drive in order to share the embedded file in Canvas. Anyone in the course can access the embedded file without a Google account sign in.
How to embed a file from Google Drive into the Rich Content Editor.
For more information about Google tools available in Canvas see our Google Assignments support page.
What are the file size limits in Canvas?
The Canvas File Quotas page contains detailed information about how these quotas dictate the available storage space for a Canvas course, group, or user.
If you run out of user file space, consider deleting personal or course files from past semesters you no longer need in Canvas. If you need help managing your user files contact please Canvas Support.
If you are attempting to upload media files in the ‘Files’ area of your course, please review take a look at our help guide first: Where can I store course recordings and other large video or media files?
- Course site: A Canvas course site can contain 10 gigabytes (GB) of data.
- File uploads (teacher): There’s a 2 gigabyte (GB) limit on single file uploads into a Canvas course.
- File uploads (student): There’s a 5 gigabyte (GB) limit on single file uploads into a Canvas course.
- Media uploads (student): There’s a 500 megabyte (MB) limit when using the Media Uploads tool in a Canvas course (Note: use the “file upload” option to allow students to upload larger files).
- User files: Canvas offers a personal files area (not associated with a course) where the size limit is 50 megabytes (MB).
- Group files: The file size limit for a Canvas course group is 50 megabytes (MB).
- Course imports: Course Import files (typically zip files) cannot exceed 5 gigabytes (GB).
Where can I store course recordings and other large video or media files?
Do not store course recordings or large media files in the Canvas course files directory. A semester’s worth of audio and video recordings could surpass the course storage space allotment. Each Canvas course has up to 10,000 MB (10GB) of storage space in Canvas.
Zoom
Zoom is is a web conferencing tool that provides a platform to conduct live online conferences, presentations, lectures, and meetings. Meeting hosts can use Zoom Cloud to record course meetings. After the meeting, the host will receive an email with a playback link to their recording. Instructors can choose to share the Zoom Cloud playback link with students by posting it in a Canvas course for example.
Things to Note:
- Zoom Cloud playback links can be viewed by anyone with the link. If a recording contains sensitive information or any FERPA related data, such as grades, it should NOT be shared from a link to the Zoom Cloud recordings.
- Zoom Cloud recordings older than 365 days will be deleted due to limited storage space in Zoom.
- Zoom Cloud recordings can be automatically copied into your Panopto account where you have better control over who can access recordings. See our help guides for more information on how to (1) opt in to this service and (2) share your Zoom Cloud recordings in Canvas via Panopto.
Panopto
Panopto is a lecture capture and media streaming service designed for asynchronous media playback. Instructors who wish to share their recordings with students in Canvas, make sure first enable Panopto in your Canvas course. Panopto playback links in Canvas will be only viewable by those enrolled in the course.
Use Panopto to record your computer audio, video and desktop display; access and share Zoom Cloud recordings; and upload and share large media files from your computer.
You can also use Panopto to upload large media files or any locally saved Zoom recordings. Panopto offers unlimited storage and content in Panopto can be copied from one Canvas course to another.
ShareStream
ShareStream is a media streaming service designed to store and deliver audio and video content. Use ShareStream to upload and deliver media files into Canvas.
Instructors will need to first enable ShareStream in their course before they can upload and share media with students. Playback links added in Canvas are only viewable by students in the course. Use ShareStream to upload large media files or any locally saved Zoom recordings.
ShareStream offers unlimited storage and media can be copied to other courses in Canvas.
Google Drive and Box
Georgetown users have Google Drive accounts with 100GB of storage. Box currently offers unlimited storage.
Things to Note:
- By default, students can download any content you share in Google Drive and Box instead of just streaming them, so if a recording contains sensitive information or any FERPA related data, such as grades, it should NOT be shared from Google Drive or Box.
- You can tailor Drive and Box settings so that media files are not downloadable. To share recordings and large media files, instructors have to enter every individual student’s NetID to share to a whole class, or otherwise make the recording accessible to everyone at Georgetown.
YouTube
Instructors can use their Georgetown Google account to upload course recordings in YouTube and share them with the class. This option is relatively easy if you intend to allow your recordings to be seen by the general public. However, we do not recommend this option for reasons of student (and instructor!) privacy.
By default, videos can be viewed by anyone, so if a recording contains sensitive information or any FERPA related data, such as grades, it should NOT be shared on YouTube. You can tailor YouTube settings so that the videos are not easy to find by the general public.
How do I add Library e-reserves in my course?
Lauinger Library COVID-19 message
There is no limit to the number of core required e-reserves readings a faculty member may have on reserve. An e-reserve is a single title of a book chapter, a journal article, or professors’ notes, syllabi, or handouts, which will be in PDF format and made available to you through Georgetown Box. These PDFs will be accessible to screen readers and can be uploaded into your Canvas course files area. If the library does not have the requested article, they will order a copy. Entire books cannot be scanned and placed on e-reserve.
The Library can also connect your Canvas course with their Media Reserves, which will made available through Sharestream in your course. The amount of film or other media you use should be only as much as necessary to support your lesson or illustrate your point.
The services described above is provided by the Lauinger Library staff for main campus courses only, but other libraries may offer similar services.
For assistance, please contact:
Jeff Popovich
Circulation/Reserves Coordinator
popovijm@georgetown.edu or reserves@georgetown.edu
(202) 687-7403
General Questions?
Visit the Circulation Desk, 3rd Floor, Lauinger Library
reserves@georgetown.edu
(202) 687-7607
Can the home page display a list of recent announcements?
Yes, your Course Home Page can be configured to show recent announcements. You can set the total number of announcements that can be displayed through the course Settings page. Note however, the Course Home Page will only display the announcement’s text, and any images or media will not be shown on the Home Page. The full version of the Announcement can be viewed through the Announcements page in the course.
How do I customize my Course Home Page?
The Course Home Page is the first view your students will see when they enter your course. This page can show a welcome message, links, images, or other information for students.
To set a custom Home Page you will need to first set a Front Page in your course. The Front Page is a designation that shows you which page can be used for the Course Home Page. Once the Front Page has been set, you will want to set the Course Home Page to your custom Front Page.
How do I add a banner (image) to my Course Home Page or any course page in Canvas?
You must first have the banner (image file) on your computer, or already uploaded to your Canvas course Files area before proceeding with these instructions.
The Home Page is the first page you and your students see when entering your Canvas course. For help setting and customizing your Course Home Page, please see the FAQ above.
You can add a banner image anywhere the Rich Content Editor (RCE) tool appears. The RCE allows you to format text, add images, attach files, link to websites, embed media, etc. when creating announcements, assignments, discussions, pages, quizzes and questions.
Add a banner to your course home page:
- Create a new page in your course
- Set the page as the Front Page in your course
- Set the Front Page as your Course Home Page
- Add images to a Page
Add a banner to your Syllabus page:
If you’d like to add a banner to your Syllabus page follow these instructions:
Add a banner anywhere the Rich Content Editor (RCE) appears:
Edit the item (announcements, assignments, discussions, pages, quizzes (and questions), syllabus, etc.)
Don’t see what you are looking for?
Check out the Get Help and Training & Support pages for more resources.